There are many indicators that track and measure all kinds of things, but few are less understood than the Ichimoku indicator. With five different components that are calculated in five different ways, it is not surprising that many traders are shy about using them.
With that in mind, we felt it was the perfect indicator for an in-depth study to see how it works and how to use it.
Ichimoku Basics
When using the Ichimoku indicator, there are some general conditions that traders may look for when deciding to take a trade. For a bullish setup, traders may look for some or all of the following conditions to be true;
- Price closed above Kumo Cloud (Senkou A and Senkou B)
- Cloud must be positive (Senkou A above Senkou B)
- The Tenkan-Sen line is larger than the Kinjun-Sen line
- Chikou Span Line over the Kumo Cloud (Senkou A and Senkou B)
For a bearish setup, traders may look for some or all of the following conditions to be true;
- Price closed below the Kumo Cloud (Senkou A and Senkou B)
- Cloud must be negative (Senkou A under Senkou B)
- The Tenkan-Sen line is lower than the Kinjun-Sen line
- Chikou Span Line under the Kumo Cloud (Senkou A and Senkou B)
Our preliminary study
We begin our study using the strategy test. In the first example you will see below, we are examining the basic version of bullish and bearish entry and exit scenarios. We did the test on the SPY ETF in dollars, we tested 7000 candles, we compared three timeframes; 15 pm, 1 hour and 1 day. For our first test set, we entered all the bullish biased trades when everyone The criteria for the ‘bullish setup’ were correct and all trades biased down when everyone The criteria for a “downside setting” were correct. In order to obtain a broad data set, we chose a set of different exit scenarios.
When you are in a bullish trade, we tested four different exits. They were as follows:
- Sell when price closes below Kinjun-Sen
- Sell when the price closes below Senkou A
- Sell when the price closes below Senkou B.
- Sell when Chikou Span closes below Senkou A and Senkou B
When you are in a bearish trade, we also tested four different exits. They were as follows:
- Sell when price closes above Kinjun-Sen
- Sell when price closes above Senkou A
- Sell when the price closes above Senkou B.
- Sell when Chikou Span closes above Senkou A and Senkou B
The data we got as a result of these tests was quite dense, so we packed everything cleanly into two separate spreadsheets so it’s easy to understand. This is what we found.
Bullish Trade Results
As you can see in the chart below, the best performing single strategy, in terms of percentage return, was the Chikou Span exit on the daily time frame. Remember, this strategy directs the trader to exit the trade when the Chikou Span closes below the Senkou A and Senkou B lines.

However, when we take a closer look at the numbers, we find that exiting the trade when the price closes below Senkou B is actually the best performer across the time frames. Using Kinjun-Sen as an exit appears to be the weakest performer, indicating that it does not allow the trade to “breathe” in the same way as alternative exits.
Another important thing to note is the relative win rate across strategies when using the hourly time frame. This indicates that the hourly time frame may be the right place for this specific strategy, regardless of the exit criteria you choose.
Bearish Trade Results
Now let’s dive into the bearish strategy. We used the criteria of a “bearish setup” to determine our entry, and once again, we tried a few different exit strategies. Just like the bullish strategy tests, we used a 7000 candles revision period and tested this strategy on the 15m, 1h and 1d timeframes on the SPY Dollar Index. Here’s how to perform it:
As you can see in the chart below, the best performing single strategy, in terms of percentage return, was the Kinjun-Sen exit on the hourly time frame. Remember, this strategy directs the trader to exit the trade when the price crosses the Kinjun-Sen line.
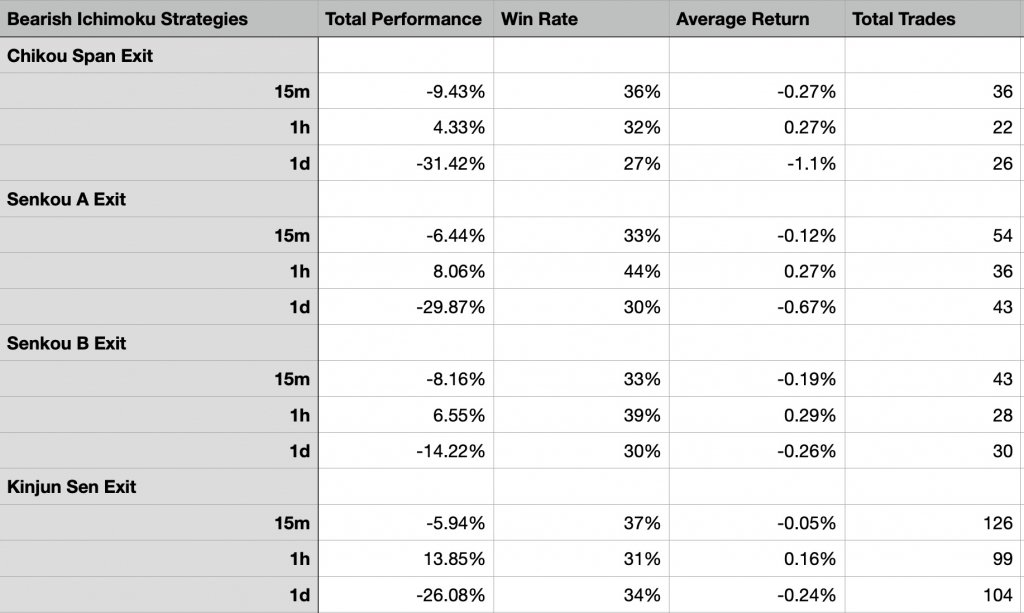
However, when we take a closer look at the numbers, we find that exiting the trade when the price closes above Senkou B is actually the best performer across the time frames. Using Chikou Span as an exit appears to be the weakest performer, indicating that it allows a lot of time to pass before the trader exits his bearish trade.
Another important thing to note is the win rate across all strategies that use the hourly time frame. Just like a bullish setup, this suggests that the hourly time frame may be the right place for this particular strategy, regardless of the exit criteria you choose.
Alternative bullish strategies
As we can see in the data above, although some of the basic strategies have yielded some decent returns, as a whole, we have been overwhelmed by the results. In fact, none of the strategies outperformed buying and holding the asset over the same period of time. We believe that this is the case because of the time it takes for all bullish or bearish conditions to become correct simultaneously. We find that much of the movement is already complete once all the factors have been met. With that in mind, we used what we learned in the test above and digged deeper to see if we could find some other favorable strategies. In the following tests, we abandoned multiple timeframes and tested only hourly, but we still used a review period of 7000 nits.
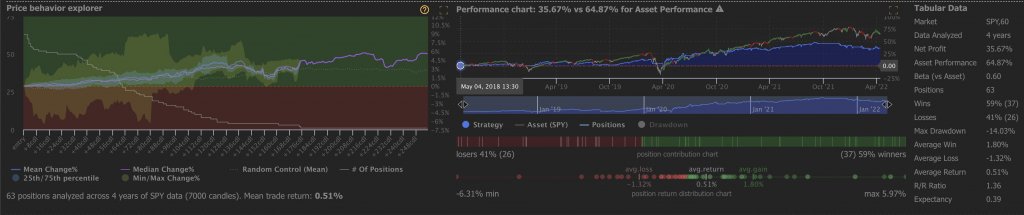
como cloud crossing
Log in when:
- Senko A intersects with Senko B
- The price is greater than Senkou A and Senkou B
exit when:
- Senkou A is less than Senkou B
consequences
We tested this strategy because it is a popular strategy used by traders. However, as we can see in the image below, this strategy does no better than the initial strategies we tested. It doesn’t quite beat buying and holding over the same time period, but the returns are +35.67%. Also of note is the 59% win rate.
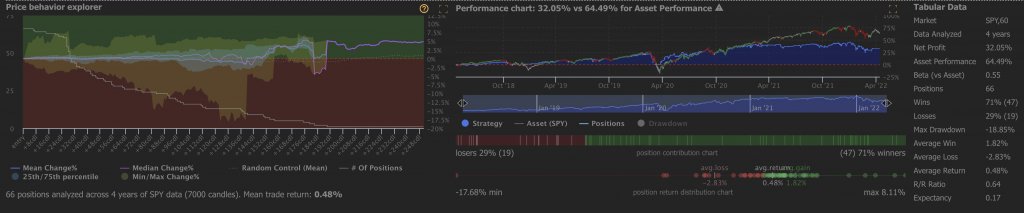
Tenkan-Sen Cross Up on Kinjun-Sen
Log in when:
- Tenkan-Sen intersects with Kinjun-Sen
- The price is greater than Tenkan-Sen
exit when:
- Senkou B crosses down on Senko A
consequences
Another interesting bullish strategy is to buy when the Tenkan-Sen crosses the Kinjun-Sen and the price is above the Tenkan-Sen. We see that this results in a net profit of +32.05% over 7000 candles. Also in this case, it is worth noting the win rate of 71%.
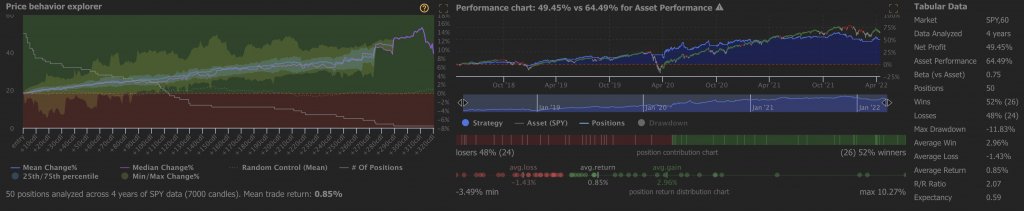
Chikou Span and Kumo Cloud
Log in when:
- Chikou Span is larger than Senkou A and Senkou B.
exit when:
- Chikou Span is lower than Senkou A and Senkou B.
consequences
An interesting final strategy is to buy when Chikou Span is above the Kumo cloud and exit when it moves below it. This strategy yielded a +49.45% profit, which is the closest we got to beating the buy-and-hold return over the same time period. However, with a win rate of 52%, it doesn’t work as well as the other strategies we tested, so it might be best for a more active trader.
Alternative Bearish Strategies
In the following tests, we tested the inverse of the “alternative bullish strategies” above. This is what we found:
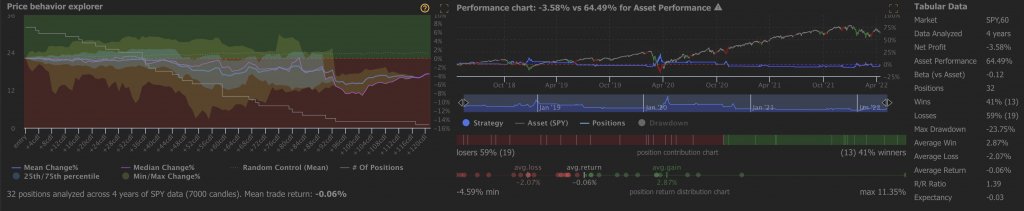
Kumo cloud crossing down
Log in when:
- Senko A intersects with Senko B
- Price is lower than Senkou A and Senkou B
exit when:
- Senkou A is bigger than Senkou B
consequences
This strategy underperformed, resulting in a loss of -3.58%. With a win rate of only 41%, we recommend retesting some alternative exits if you are interested in trading this strategy under this name.
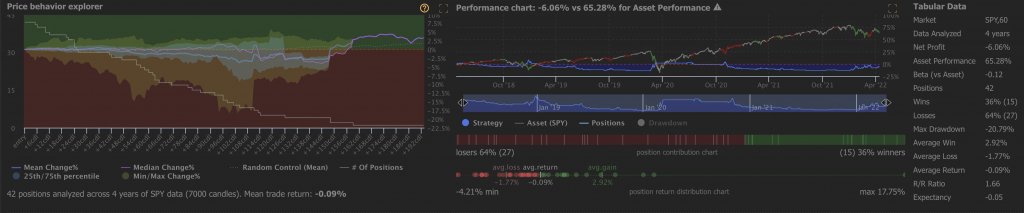
Tenkan-Sen Cross Down on Kinjun-Sen
Log in when:
- Tenkan-Sen crosses down on Kinjun-Sen
- Price is lower than Tenkan-Sen
exit when:
- Senko B intersects with Senko A
consequences
This strategy results in poorer performance than the previous strategy, with netting loss if -6.06%. To the next!
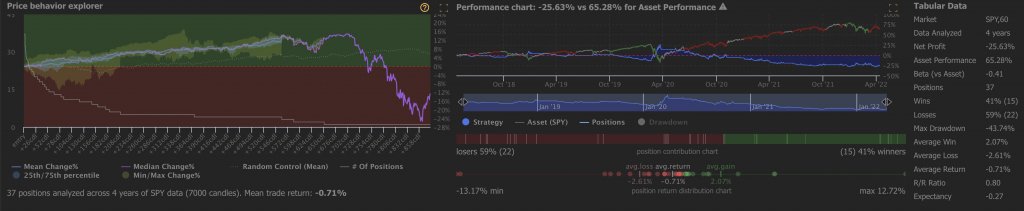
Chikou Span and Kumo Cloud
Log in when:
- Chikou Span is lower than Senkou A and Senkou B.
exit when:
- Chikou Span is larger than Senkou A and Senkou B.
consequences
Based on the results of its bullish counterpart, we had high hopes for this strategy. However, as you can see in the image below, it was the worst performer of the three with a massive net loss of -25.63%.
what did we learn?
The first and most obvious result we noticed was that bullish setups produce better returns than bearish setups across all time frames. Another interesting finding is the relative success rate and rate of return on the hourly time frame. Obviously, the hourly time frame is the place for bullish and bearish versions of these strategies. After testing some of the more precise strategies, it is clear that the “broad brush” strategies we tested at the beginning of this blog hold up compared to the more specific ones.
On the upside, we like the “Chikou Span and Kumo Cloud” strategy which instructs the trader to enter when the Chikou Span is above the Kumo cloud and exit when it is below the cloud. On the downside, the “Kinjun-Sen exit” of the “wide brush” strategy appears to be a better performer.
We hope you found this helpful, and if you have any questions, feel free to reach out to us via chat!